

Kitchen Drawer Front Replacement: Options, Costs & Installation Guide
A scratched drawer front, chipped finish, or dated cabinet style can make an otherwise functional kitchen look tired. Fortunately, you can often replace just the kitchen drawer front without replacing the drawer box or the entire cabinet.
That approach works especially well when the drawer still opens smoothly, the cabinet structure is sound, and you want to update the visible surface rather than redesign the kitchen.
But replacement isn't always as simple as ordering a panel in the right color. Front dimensions, overlay or inset construction, mounting hardware, and neighboring cabinet doors all affect the result.
This guide covers kitchen drawer front replacement options, how to measure correctly, real product-price examples, installation steps, and when a more extensive cabinet upgrade makes better sense.
Quick answer: A drawer front is the decorative panel visible when a drawer is closed. Replacing it generally means detaching that panel and fitting a compatible new one while keeping the working drawer box, slides, and cabinet in place. If the drawer box or slides are damaged, those parts may also need repair or replacement.
What Is Kitchen Drawer Front Replacement?
Kitchen drawer front replacement means removing the existing decorative panel from a cabinet drawer and attaching a new front to the retained drawer box or drawer hardware.
The new front may match the existing kitchen or introduce a different appearance, such as a Shaker panel, a flat slab, painted MDF, or natural wood.
The front is not the same as the drawer box. The drawer box is the container that holds utensils, cookware, or other contents. It slides in and out on the drawer hardware. The front is the finished face you see when the drawer is closed.
Some drawer systems fasten the decorative front with screws from inside the drawer box. Others use manufacturer-specific brackets or clips that connect the front to metal drawer sides. The replacement method must match the actual hardware.
Photo note: The photograph below illustrates the appearance of a kitchen drawer and its interior. It is a reference photograph, not a HighGarden Builder installation or an image showing a completed front-replacement project.

Can You Replace Just the Drawer Front Without Replacing the Cabinet?
Yes, in many kitchens. If the drawer box, slides, and cabinet are in good condition, the decorative front can often be replaced independently.
Replacing the front alone is worth considering when:
One or more faces are scratched, chipped, cracked, or discolored.
The drawer opens and closes correctly.
The drawer box is securely assembled and free from significant moisture damage.
Matching replacement fronts are available, or custom fronts can be made.
The new front can fit the existing drawer system and available clearances.
It may not be the best solution if the drawer binds, the box is swollen or broken, the slides are failing, or the new style is incompatible with the mounting arrangement. A new panel will not fix a damaged drawer mechanism.
Also identify whether the panel is a false drawer front—a fixed decorative piece, often below a sink. False fronts are mounted differently from working drawers and must not be treated as pull-out drawer components.
Drawer Front vs. Drawer Box vs. Complete Cabinet Replacement
Component | What it is | Replace it when... |
|---|---|---|
Drawer front | Decorative, visible face of the drawer | The panel is damaged or the style needs updating |
Drawer box | Interior container that holds items | Joints, sides, bottom, or box structure are failing |
Drawer slides | Hardware that lets the drawer move | The drawer sticks, sags, or fails to operate properly |
Cabinet unit | Surrounding structural enclosure | The layout, dimensions, or cabinet construction no longer work |
This distinction can save unnecessary work. If only the visible front is worn, keeping a well-functioning drawer box may be the most targeted repair. If the cabinet has deeper structural or layout problems, the front alone is not enough.
Replacement Drawer Front Styles and Materials
Choosing the replacement material involves more than selecting a color. Door style, finish, edge profile, mounting compatibility, cleaning requirements, and the rest of the kitchen should all be considered.
Shaker Drawer Fronts
Shaker fronts use a simple frame-and-panel appearance. They can work in traditional, transitional, and contemporary kitchens, depending on the paint or wood finish.
A Shaker replacement may be especially appealing if you plan to update cabinet doors at the same time. But very shallow drawer fronts may require a modified rail-and-stile proportion, so check the manufacturer's minimum-height specification.
Flat or Slab Drawer Fronts
A slab front has a smooth, uninterrupted face. It works well with minimalist or contemporary cabinetry and can be easier to coordinate with streamlined hardware.
Slab fronts can be made in paint-grade engineered wood, veneer, laminate, or other specified products. Check edge finishing and moisture resistance when comparing options.
Solid Wood and Wood-Veneer Fronts
Natural wood can provide warmth and visible grain. The species, finish, and grain orientation affect the final result.
If you're replacing only one front, matching the aged color and grain of existing cabinets can be difficult. Request a physical sample rather than relying exclusively on a screen image.
Painted MDF and Other Engineered Materials
Paint-grade MDF is often selected for its smooth surface and consistency. Its edges must be properly sealed and protected from moisture. Foil-wrapped or laminate options can also be appropriate when specified for the existing cabinet system.
For a consistent appearance, match the replacement front to nearby cabinet doors—not just to other drawers.
How to Measure Replacement Kitchen Drawer Fronts
Accurate measurement is the step most likely to prevent an expensive ordering mistake. Custom fronts are frequently manufactured to the dimensions submitted by the buyer.
Method 1: Measure an Existing Front That Already Fits
If the old drawer front fits correctly and you're keeping the same overlay and mounting arrangement, this is usually the easiest method.
Open the drawer and inspect how its front is attached.
Remove the panel only if doing so is safe and consistent with the hardware system.
Measure the finished front itself, from edge to edge—not just the drawer box.
Record width first, then height, preferably to the nearest 1/16 inch.
Measure every front separately and label its exact location.
Photograph the back of the front, screw holes, brackets, and nearby gaps.
Do not assume all the fronts in one kitchen are the same size, even when they appear similar.
Method 2: Measure the Opening and Calculate the Front Size
If the original front is missing or you're changing the design, determine whether the cabinetry uses an overlay or inset arrangement.
Overlay fronts cover part of the cabinet frame or surrounding opening. The finished front is larger than the opening. As a simplified example, an opening 15 inches wide with a 1/2-inch overlay on each side requires a front 16 inches wide, provided the cabinet layout and adjacent gaps permit that coverage.
Inset fronts sit within the opening. Their finished size must allow a planned clearance on each side. For example, a 15-inch opening with a 1/8-inch gap on each side would call for a front 14 3/4 inches wide, assuming the system is designed for that reveal.
These examples explain the arithmetic; they are not universal ordering formulas. Real layouts can have uneven face frames, shared rails, asymmetric reveals, and manufacturer-specific mounting requirements. Verify the chosen product's measuring instructions before ordering.
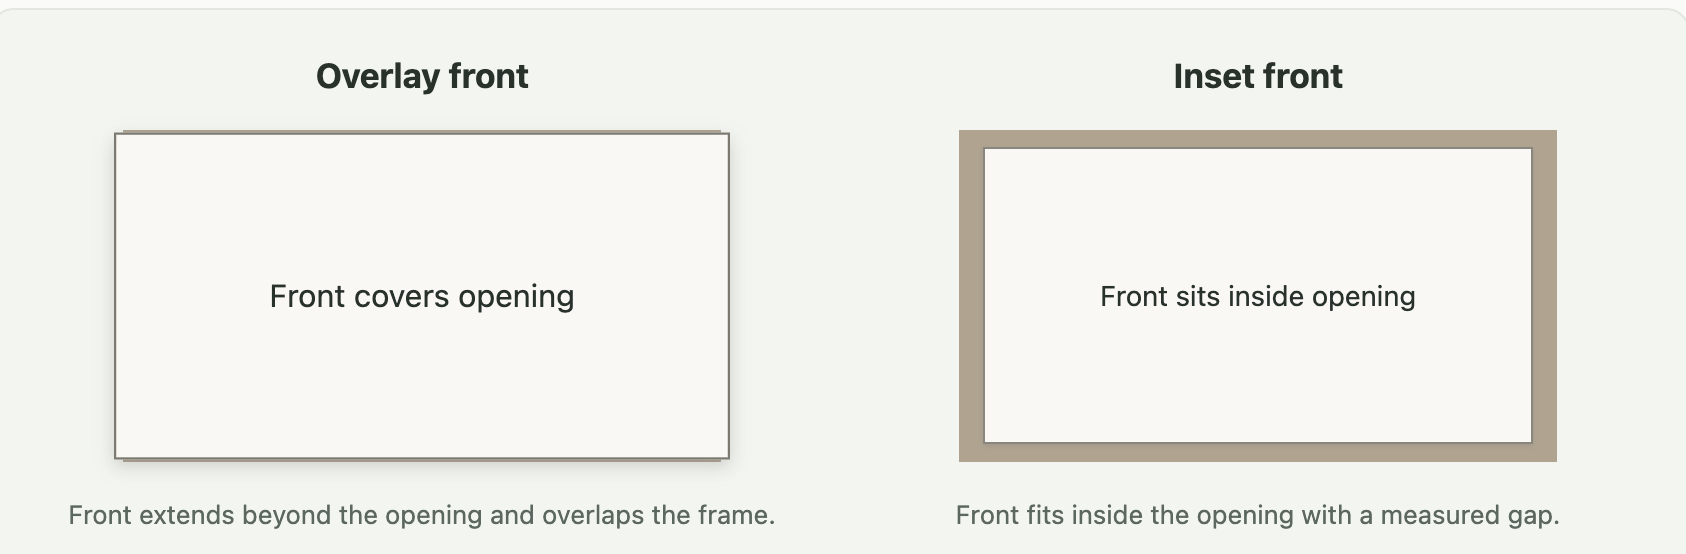
Original simplified illustration. Exact clearances depend on cabinet design and hardware.
For additional measurement details, see the manufacturer's instructions at QuikDrawers or Eagle Woodworking.
Your Measurement Checklist
Before ordering, verify the following:
Width × height of each finished front.
Thickness required by the mounting hardware.
Overlay or inset type and neighboring reveals.
Number and position of drawer fronts.
Handle center-to-center spacing if hardware will be reused.
Bracket or screw fixing locations, where required.
Maximum and minimum dimensions allowed by the manufacturer.
Finish and grain direction.
Ordering with an incorrect size or mounting pattern can mean buying the front twice.
How Much Does Drawer Front Replacement Cost in 2026?
There isn't a reliable single nationwide installed price for every drawer front replacement. Prices depend on whether you are purchasing a standardized system part or ordering custom components, how many fronts are involved, and the cost of fitting them.
To make the budget more concrete, here are published retail product examples, not an estimate of HighGarden Builder's charges:
Published product example | Listed price reference | What it covers |
|---|---|---|
IKEA VEDDINGE white front, 15 × 10 in. | $18 each | One compatible SEKTION-system front; no installation |
IKEA VEDDINGE white front, 30 × 10 in. | $28 each | One larger compatible front; no installation |
CabinetDoors.com unfinished paint-grade Shaker front | $29.14/sq. ft. + $6 per front | Starting product formula for a specified style; finish and installation may add cost |
Price references checked October 2026: IKEA VEDDINGE listing and CabinetDoors.com Shaker front. Prices, product options, minimum charges, and availability can change.
For example, buying eight $18 system fronts would total $144 in product cost alone. That does not include handles, mounting hardware, taxes, shipping, removal of old panels, adjustments, or professional labor. It also assumes all eight openings accept that exact product, which may not be the case.
A custom Shaker front measuring 20 × 8 inches has an area of about 1.11 square feet. Using the starting supplier formula above would produce approximately $38.38 for one unfinished front before extras. That is an illustrative product calculation, not a completed installed price or a guaranteed order quote.
What Drives the Total Cost?
Material and finish: Standard painted fronts, unfinished wood, finished wood, and specialty products have different costs.
Size and number of fronts: Large and unusual dimensions can affect fabrication and delivery charges.
Matching requirements: A replacement made to match older cabinets may require samples or a custom finish.
Mounting system: Reusing straightforward screw locations is different from fitting specialized clips or modifying hardware.
Professional labor: Small jobs can have mobilization or minimum-service charges, and the estimate depends on site conditions.
Related repairs: Broken slides, damaged drawer boxes, and water-damaged cabinets are separate problems.
If you're replacing many fronts at once, compare the combined cost with cabinet refacing or a broader cabinet update before ordering components individually.
How to Replace Kitchen Drawer Fronts: Step by Step
The exact procedure depends on whether your drawer uses screws, brackets, or a proprietary clip-on system. These steps describe the general workflow rather than instructions for every manufacturer's hardware.
Step 1: Check the Drawer and Mounting Hardware
Open the drawer fully and inspect the inside face. Look for screws entering the back of the front, adjustable connectors, or release clips. Photograph the original installation before removing anything.
If the front is part of a branded metal drawer system, use that system's instructions rather than forcing the panel off.
Step 2: Remove the Existing Front
Support the front and remove the appropriate fasteners or release the manufacturer's fixing clips. Store reusable hardware safely. For a damaged or loose box, address the drawer structure before proceeding.
Step 3: Test-Fit the New Front
Before drilling or fastening, hold the replacement in position and check the clearances against adjacent doors, drawers, countertop edges, and appliances.
A front may fit the opening numerically but still interfere with a neighboring drawer or pull.
Step 4: Align and Attach
For a screw-mounted front, temporarily hold or clamp the panel in position, keeping consistent gaps. Where the hardware requires it, prepare pilot holes using the correct bit and depth. Use suitable fasteners that will not penetrate the finished face.
For a clip-mounted system, install the manufacturer's brackets or adapters in the specified locations, then connect the front according to its instructions. As a reference, DIY Kitchens illustrates a clip-and-adjust system; other systems differ.
Step 5: Adjust the Reveal and Hardware
Check that the drawer front sits level and lines up with the fronts beside it. Make any permitted vertical, horizontal, or tilt adjustments. Refit handles or pulls using an appropriate template, taking care not to drill through the wrong location.
Step 6: Test the Drawer in Use
Open and close the drawer several times. Confirm that it clears the surrounding cabinetry and that screws, clips, and handles remain secure. Check again after normal use, particularly if the existing drawer hardware was reused.
Stop if a panel binds, a bracket will not engage, or mounting screws lack safe material to grip. Forcing the parts can damage the new front or existing box.
DIY vs. Professional Drawer Front Installation
DIY replacement may be reasonable for one straightforward, accessible drawer when the existing box is sound and compatible parts are available. It becomes more challenging with custom fronts, integrated metal drawer systems, inset cabinetry, multiple closely spaced fronts, or older, uneven installations.
DIY may be reasonable when... | Professional assessment is especially useful when... |
|---|---|
One front needs replacement | Several fronts must align across a long cabinet run |
The original mounting is simple and documented | Special clips or unfamiliar hardware are involved |
Matching dimensions are available | Custom doors and drawer fronts need coordinated finishes |
Cabinet and drawer are sound | Drawer boxes, slides, or surrounding cabinetry are damaged |
Professional work may also be worthwhile when the drawer front replacement is part of a larger cabinetry project and finish consistency matters throughout the room.
IKEA and Other Modular Kitchen Drawer Fronts
Some modular cabinet systems use proprietary dimensions and fixings. Compatibility matters more than a nominal size printed on the listing.
For instance, IKEA identifies its VEDDINGE replacement fronts as fitting the SEKTION kitchen series. That does not mean every IKEA drawer front fits every older IKEA cabinet line or another manufacturer's drawer hardware.
Before ordering a modular replacement, confirm the cabinet-system name, front series, actual panel measurements, mounting points, and whether the finish is still available. If the original product is discontinued, a custom solution may require additional hardware or changes to neighboring fronts.
When Is Replacing the Drawer Front Not Enough?
Replacing only the front won't solve every kitchen problem. Consider a broader cabinet repair or renovation if:
Drawer boxes are swollen, separated at the joints, or cracked.
Slides no longer support the drawer properly.
Several cabinet faces are damaged and the finishes are impossible to match.
Existing storage is inefficient or the kitchen layout feels cramped.
Water or structural damage affects the cabinet boxes.
The cost of many custom replacements approaches a coordinated cabinetry upgrade.
In those situations, compare a focused repair, cabinet refacing, selective replacement, and new cabinet installation. These are different scopes of work with different results.
Drawer Front Replacement in Newton and Greater Boston
Kitchen cabinetry in Newton, Wellesley, Needham, Brookline, and other Greater Boston communities can vary significantly in age and construction. Some homes retain older face-frame cabinetry or custom-built drawers; others use modular units with manufactured hardware.
For older kitchens, inspect the mounting and cabinet condition before ordering parts. A replacement front may need to accommodate irregular dimensions, an existing trim profile, or a finish that has changed color over time.
Pre-1978 homes: If the work will disturb older painted surfaces, review the Massachusetts lead-safe renovation requirements. The state's rules depend on the property and scope of paint disturbance. Avoid treating removal or sanding of old finishes as automatically risk-free.
HighGarden Builder provides cabinet installation and kitchen remodeling services in Newton and Greater Boston. A standalone drawer-front-only replacement is not separately listed as a confirmed service, so homeowners should describe their scope when contacting HighGarden to check whether it fits the team's current work.
Frequently Asked Questions About Drawer Front Replacement
Can you replace drawer fronts without replacing the drawer boxes?
Yes, if the existing boxes are sound and the replacement fronts can be attached with compatible hardware. The front is normally a separate decorative component.
Can I replace only one kitchen drawer front?
Often, yes. The challenge is matching color, sheen, wood grain, profile, and hardware to nearby cabinetry, especially when the existing finish has aged or the original product has been discontinued.
How do I know what size drawer front to order?
If an existing front fits correctly, measure its finished width and height. If it is missing or the design changes, calculate the size from the cabinet opening and the required overlay or inset reveals. Follow the supplier's measuring guide and confirm hardware compatibility before placing an order.
What is the difference between a drawer front and a drawer face?
In ordinary cabinet terminology, drawer front and drawer face often refer to the same visible decorative panel. Neither term necessarily means the entire drawer box.
Can I put Shaker fronts on existing drawers?
Often, yes, provided suitable dimensions, mounting space, and attachment methods are available. Very shallow fronts may not accommodate every Shaker frame design.
Is it cheaper to replace a drawer front or the entire drawer?
Replacing just the front usually requires fewer new components when the drawer box and slides are functioning. But custom matching, specialized hardware, and labor may affect total cost, so compare complete quotes.
Does a drawer front replacement include new slides?
Not automatically. Slides are separate hardware. If a drawer binds or sags because of failing slides, new fronts alone will not fix it.
Can IKEA drawer fronts fit non-IKEA cabinets?
Do not assume so. IKEA fronts are specified for particular cabinet systems, and their mounting points or dimensions may not match unrelated products. Verify every dimension and fixing detail before buying.
How long does replacing drawer fronts take?
It depends on whether parts are available, how many fronts need work, and how they are mounted. Ordering custom fronts can take longer than the physical installation. Ask the installer to separate material lead time from on-site work time.
Is drawer front replacement the same as cabinet refacing?
Not exactly. Replacing drawer fronts alone updates only those panels. Cabinet refacing normally includes new cabinet doors and drawer fronts plus matching finishes on visible cabinet-box surfaces.
Final Thoughts: Update the Right Part of Your Kitchen
Kitchen drawer front replacement can be a focused way to refresh cabinets when the existing drawers and cabinet boxes are still functional. The key is matching the new panels to the correct dimensions, materials, and hardware.
Before ordering, confirm whether you need a new decorative front, an entire drawer box, a hardware repair, or a more complete cabinetry update. That distinction can save money and help you avoid an installation that looks new but still does not function well.
If your plans extend beyond one or two drawer fronts, HighGarden Builder can discuss its cabinet installation and kitchen remodeling services in Newton and Greater Boston.
